> ## Documentation Index
> Fetch the complete documentation index at: https://docs.airmdr.com/llms.txt
> Use this file to discover all available pages before exploring further.
# Abnormal Security
> The Abnormal Security integration enables AirMDR to securely connect to the Abnormal Security REST API and use supported skills to retrieve or manage Abnormal Security data, such as detected email threats and security cases.
| Component | Supported version |
| :- | :- |
| Abnormal Security | Cloud-based Abnormal Security platform with REST API access |
| Abnormal Security API | REST API v1 |
| AirMDR | Current cloud-hosted AirMDR platform |
| Authentication | Bearer API token |
| Network protocol | HTTPS over TCP port 443 |
AirMDR authenticates with Abnormal Security using a bearer API token.
When AirMDR makes an API request, the token is submitted in the following HTTP header: `Authorization: Bearer `
Enter only the generated token in the AirMDR **API Token** field. Do not add the `Bearer` prefix unless the AirMDR UI explicitly requests it.
### Required role
The user creating the token must be able to:
* Access **Settings → Integrations**.
* Create and manage API tokens.
* Select the tenant associated with the token.
* Assign API endpoint permissions.
* Configure token expiration and IP safelisting, when applicable.
### Token access requirements
Use **Custom Access** and grant only the endpoints required by the AirMDR skills that will use this connection.
For example:
| AirMDR operation | Suggested Abnormal Security access |
| :- | :- |
| Retrieve detected threats | **Threats – Read Access** |
| Retrieve case information | **Cases – Read Access** |
| Retrieve employee information | **Employees – Read Access** |
| Perform an action on a threat | Corresponding **Threats write/manage access** |
| Perform an action on a case | Corresponding **Cases write/manage access** |
### Pre-requisites
>
> Users must have Administrator access to the **Abnormal Security** UI with sufficient privileges to create an API key.
>
>
>
> Permission to create and access the Abnormal Security **API keys** settings.
>
Some endpoints require an additional Abnormal Security license. For example, access to the Cases API requires an Account Takeover Protection license.
## Setup Steps
1. Sign in to the [Abnormal Security](https://portal.abnormalsecurity.com) portal.
2. From the navigation menu, select **Settings & Configuration →** **Integrations**.
3. Locate the **API Token Management** section.
4. Click **+ Create New Token**.
 5. For **Integration Type**, select **REST API**.
6. Click **Next**.
7. Continue with the applicable token-scope procedure, under **Token Scope**, select the appropriate scope.
* Option 1: Tenant (Single Tenant)
* Option 2: Customer (Multiple Tenants)
Use this scope when the AirMDR connection needs to access only one Abnormal Security tenant.
1. Under **Token Scope**, select **Tenant (Single Tenant)**.
2. From the tenant list, select the organization that will connect to AirMDR.
3. Click **Next**.
4. Under **Configure Access Type**, select **Custom Access**.
5. Select the API endpoints required by the supported AirMDR skills.
6. Assign the minimum required access level to each selected endpoint. For example:
| Required operation | Suggested access |
| - | - |
| Retrieve detected threats | Threats – Read Access |
| Retrieve security cases | Cases – Read Access |
7. Click **Next**.
8. Continue to Configure the Token Details.
Access to some endpoints may depend on the Abnormal Security products licensed for the selected tenant. For example, the Cases API requires an Account Takeover Protection entitlement.
Use this scope only when the AirMDR connection is intended to access multiple Abnormal Security tenants managed under the same customer or partner account.
1. Under **Token Scope**, select the applicable customer-level option, such as **Customer (All Current and Future Tenants)**.
2. Select the customer account associated with the tenants that AirMDR must access.
3. Review the scope carefully. If **All Current and Future Tenants** is selected, the token may also apply to tenants added to the customer account after the token is created.
4. Click **Next**.
5. Under **Configure Access Type**, select **Custom Access**.
6. Select only the API endpoints required by the supported AirMDR skills.
7. Assign the minimum required access level for each endpoint.
8. Verify that the selected endpoint permissions are appropriate for every tenant covered by the token.
9. Click **Next**.
10. Continue to Configure the Token Details.
A customer-level token can provide access to data from multiple tenants. Use this scope only when multi-tenant access is required and approved by your organization.
If different tenants require different permissions or access restrictions, create separate single-tenant tokens and AirMDR connections instead of using one broadly scoped customer token.
Complete these steps after selecting either the single-tenant or multiple-tenant scope:
1. Enter a recognizable **Token Name**.
5. For **Integration Type**, select **REST API**.
6. Click **Next**.
7. Continue with the applicable token-scope procedure, under **Token Scope**, select the appropriate scope.
* Option 1: Tenant (Single Tenant)
* Option 2: Customer (Multiple Tenants)
Use this scope when the AirMDR connection needs to access only one Abnormal Security tenant.
1. Under **Token Scope**, select **Tenant (Single Tenant)**.
2. From the tenant list, select the organization that will connect to AirMDR.
3. Click **Next**.
4. Under **Configure Access Type**, select **Custom Access**.
5. Select the API endpoints required by the supported AirMDR skills.
6. Assign the minimum required access level to each selected endpoint. For example:
| Required operation | Suggested access |
| - | - |
| Retrieve detected threats | Threats – Read Access |
| Retrieve security cases | Cases – Read Access |
7. Click **Next**.
8. Continue to Configure the Token Details.
Access to some endpoints may depend on the Abnormal Security products licensed for the selected tenant. For example, the Cases API requires an Account Takeover Protection entitlement.
Use this scope only when the AirMDR connection is intended to access multiple Abnormal Security tenants managed under the same customer or partner account.
1. Under **Token Scope**, select the applicable customer-level option, such as **Customer (All Current and Future Tenants)**.
2. Select the customer account associated with the tenants that AirMDR must access.
3. Review the scope carefully. If **All Current and Future Tenants** is selected, the token may also apply to tenants added to the customer account after the token is created.
4. Click **Next**.
5. Under **Configure Access Type**, select **Custom Access**.
6. Select only the API endpoints required by the supported AirMDR skills.
7. Assign the minimum required access level for each endpoint.
8. Verify that the selected endpoint permissions are appropriate for every tenant covered by the token.
9. Click **Next**.
10. Continue to Configure the Token Details.
A customer-level token can provide access to data from multiple tenants. Use this scope only when multi-tenant access is required and approved by your organization.
If different tenants require different permissions or access restrictions, create separate single-tenant tokens and AirMDR connections instead of using one broadly scoped customer token.
Complete these steps after selecting either the single-tenant or multiple-tenant scope:
1. Enter a recognizable **Token Name**.
Single-tenant example: `AirMDR-Abnormal-Production-Tenant`
Multiple-tenant example: `AirMDR-Abnormal-Multi-Tenant`
2. Enter a description that identifies the connection’s purpose and scope.
Example: `Token used by AirMDR to execute approved Abnormal Security skills for the selected tenant scope.`
3. Select a **Token Expiration Period** that complies with your organization’s credential-rotation policy.
4. In **IP Safelist**, enter the approved AirMDR outbound IPv4 or IPv6 addresses or CIDR ranges.
Obtain the applicable outbound IP addresses from your AirMDR administrator or AirMDR Support. Requests may return `403 Forbidden` if the AirMDR outbound IP addresses are not included in the safelist.
5. Review the following token settings:
* Integration type
* Token scope
* Included tenants
* API endpoint permissions
* Expiration period
* IP safelist
6. Click **Create Token**.
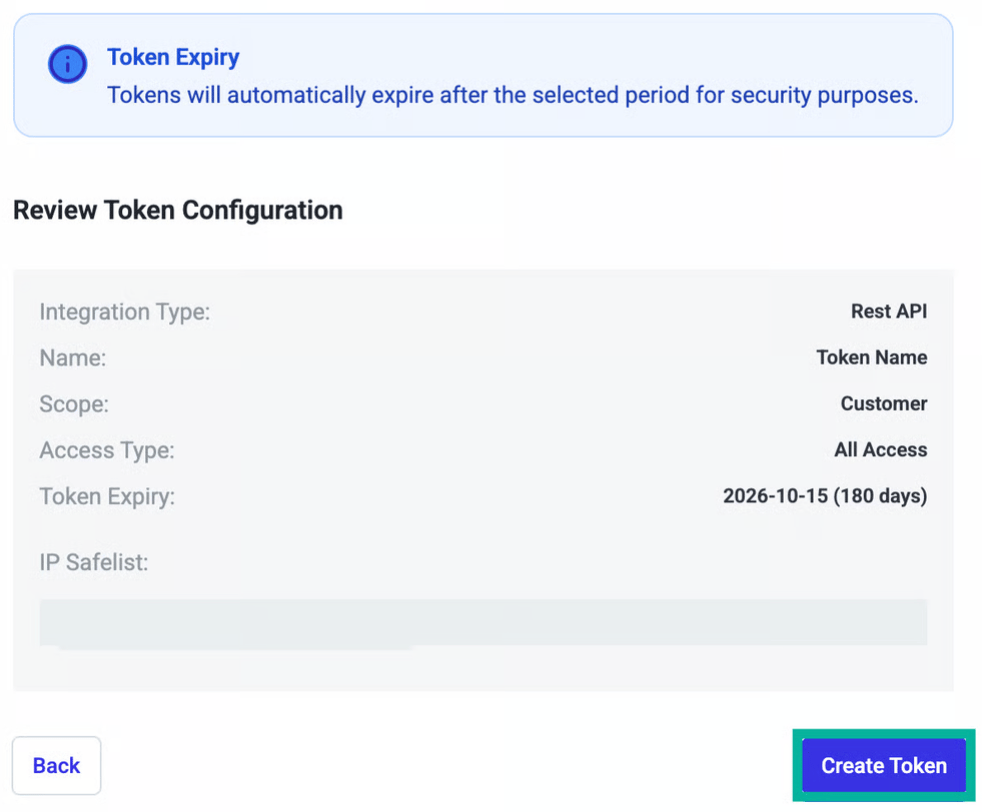 7. Copy the generated API token immediately.
Abnormal Security displays the token only once. Make sure to record the token before closing this modal, Abnormal Security will never again provide that token to you, this is your one and only chance to record it.
7. Copy the generated API token immediately.
Abnormal Security displays the token only once. Make sure to record the token before closing this modal, Abnormal Security will never again provide that token to you, this is your one and only chance to record it.
**If it is lost, generate a new token.**
 8. Store the token in an approved secrets manager or encrypted credential vault and share it securely with AirMDR.
9. Click **Done**.
Treat the API token as a password. Do not include it in documentation, screenshots, tickets, email, Slack messages, logs, or source-control repositories.
If your tenant does not display API Token Management, navigate to **Settings → Integrations → Additional Integrations → Abnormal REST API →** Click **Connect**.
8. Store the token in an approved secrets manager or encrypted credential vault and share it securely with AirMDR.
9. Click **Done**.
Treat the API token as a password. Do not include it in documentation, screenshots, tickets, email, Slack messages, logs, or source-control repositories.
If your tenant does not display API Token Management, navigate to **Settings → Integrations → Additional Integrations → Abnormal REST API →** Click **Connect**.
Configure the required access and IP safelist to generate and copy the token.
#### **Manage, Rotate, and Revoke Tokens**
On the **API Token Management** dashboard, you can search, filter, rotate, revoke, and edit existing tokens. Use the search bar to filter by token name, scope, or access type.
Navigation Path: **Settings → Integrations → API Token Management**
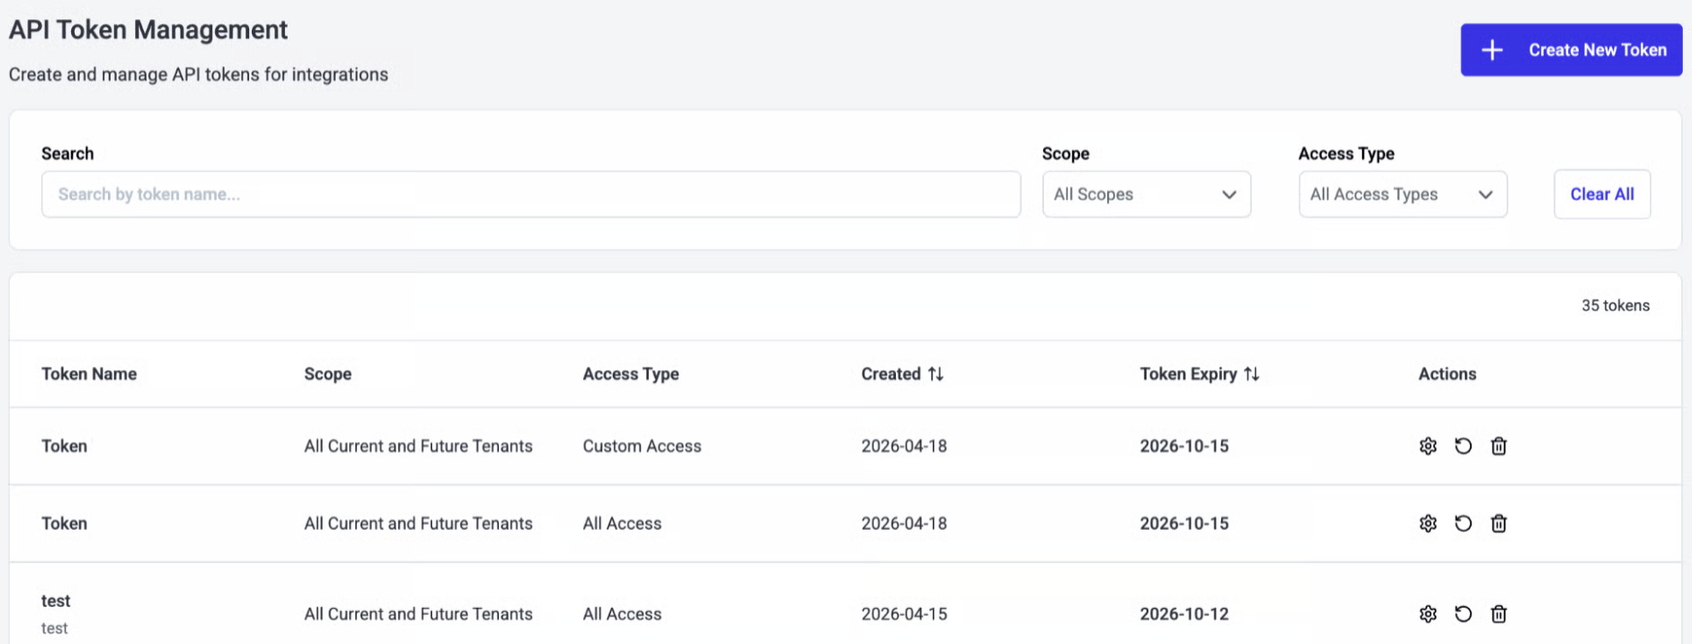 Rotating a token generates a new token value and immediately invalidates the existing value. The token scope, access permissions, and IP safelist remain unchanged.
Rotation immediately invalidates the API token currently stored in AirMDR. Until the AirMDR connection is updated, requests may fail with a `401 Unauthorized` response.
To rotate an API token:
1. Click the **rotate icon** (rotating arrow icon).
2. Select a new token expiration date.
3. Click **Rotate Token**.
Rotating a token generates a new token value and immediately invalidates the existing value. The token scope, access permissions, and IP safelist remain unchanged.
Rotation immediately invalidates the API token currently stored in AirMDR. Until the AirMDR connection is updated, requests may fail with a `401 Unauthorized` response.
To rotate an API token:
1. Click the **rotate icon** (rotating arrow icon).
2. Select a new token expiration date.
3. Click **Rotate Token**.
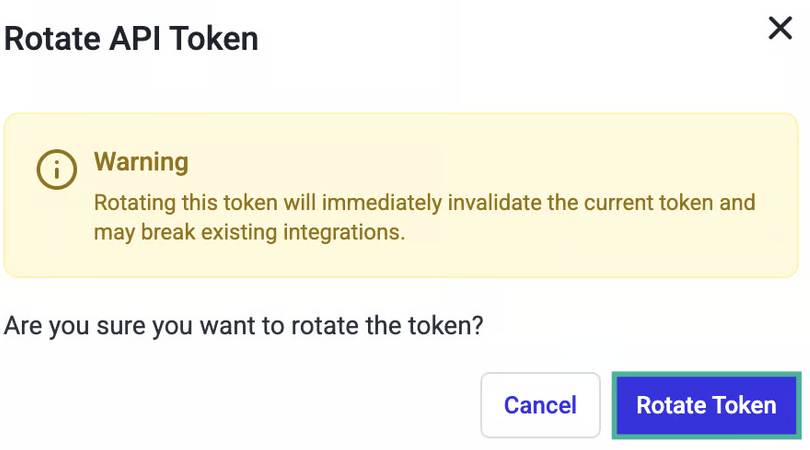 4. Copy the newly generated token immediately and store it temporarily in an approved secure location.
5. Return to the AirMDR connection.
6. Replace the existing value in **API Token** with the new token.
7. In **Expiry**, select the new Abnormal Security token expiration date.
8. Click **Save**.
To edit an existing token:
1. Click the cog wheel icon to open a **Token Details** page.
4. Copy the newly generated token immediately and store it temporarily in an approved secure location.
5. Return to the AirMDR connection.
6. Replace the existing value in **API Token** with the new token.
7. In **Expiry**, select the new Abnormal Security token expiration date.
8. Click **Save**.
To edit an existing token:
1. Click the cog wheel icon to open a **Token Details** page.
You can update any of the following:
* Token name
* Description
* Safelisted IP addresses
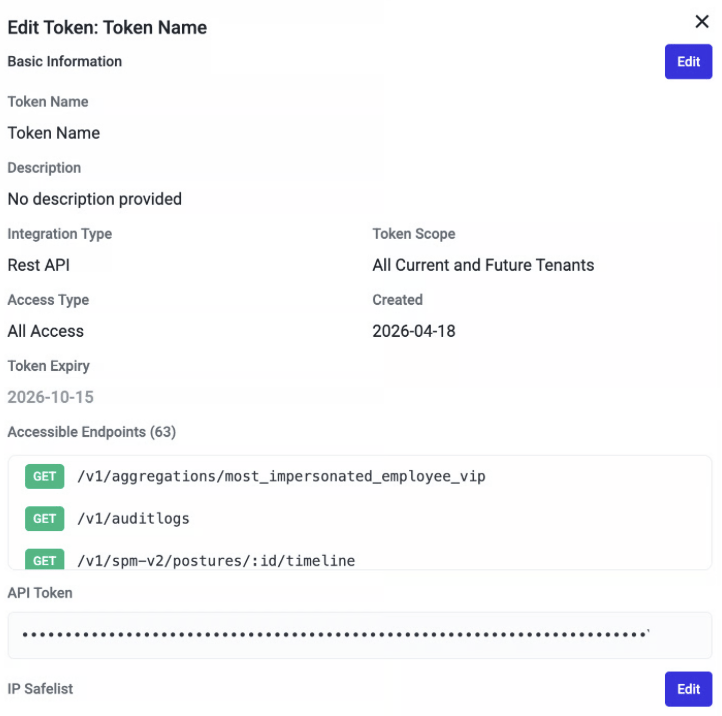 2. Save the changes.
If the AirMDR connection uses a Remote Agent, ensure that the Remote Agent’s public outbound IP address is included in the token’s IP Safelist.
2. Save the changes.
If the AirMDR connection uses a Remote Agent, ensure that the Remote Agent’s public outbound IP address is included in the token’s IP Safelist.
Otherwise, Abnormal Security may reject AirMDR requests.
Revocation immediately and permanently invalidates a token. Unlike rotation, revocation does not generate a replacement token.
**Revoke a token when:**
* The AirMDR connection is being decommissioned.
* The token is suspected to have been compromised.
* A policy change requires removing the granted access.
* A new token with a different scope or access level has replaced the existing token.
* A legacy token has been successfully replaced.
Revocation cannot be undone. If AirMDR continues using the revoked token, API requests will fail with a `401 Unauthorized` response.
**Before revoking a token that is still used by AirMDR:**
1. Create a replacement token.
2. Update the AirMDR connection with the replacement token.
3. Update the **Expiry** field.
4. Save and validate the connection.
5. Revoke the previous token only after successful validation.
**To revoke the token:**
1. Sign in to the Abnormal Security portal.
2. Navigate to **Settings → Integrations → API Token Management**.
3. Find the token that you want to revoke.
4. Click the **trash icon**.
5. Review the permanent-action warning.
6. Click **Revoke Token**.
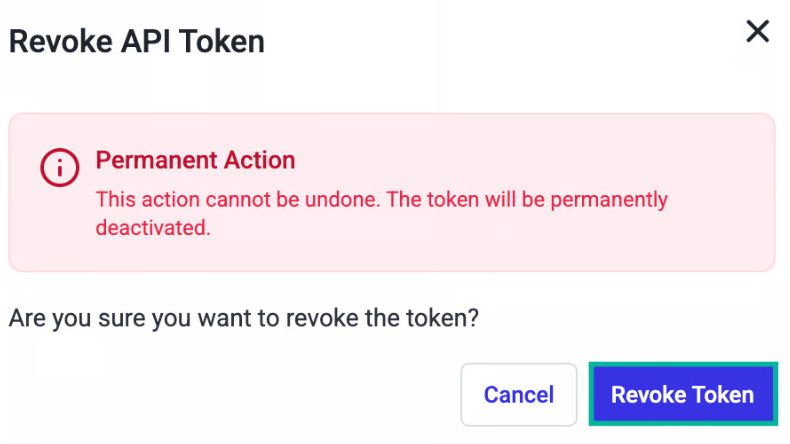 7. Confirm that the revoked token is no longer used by any AirMDR connection or other integration.
The Base URL is not generated with the token. Select it based on the region in which your Abnormal Security tenant is hosted.
| Tenant region | Base URL |
| - | - |
| US or standard production | `https://api.abnormalplatform.com` |
| European Union | `https://eu.rest.abnormalsecurity.com` |
These regional endpoints are listed in the [Abnormal Security API specification](https://apis.io/apis/abnormal/abnormal-cases-api/?utm_source=chatgpt.com).
Enter the Base URL only. Do not append an individual resource path such as `/threats` or `/cases`.
If you are unsure of the tenant region:
* Review your Abnormal Security onboarding information.
* Check the region associated with your tenant.
* Contact your Abnormal Security administrator or Abnormal Security Support.
For a FedRAMP/GovCloud environment, confirm the supported Base URL with Abnormal Security and AirMDR Support before creating the connection.
### **Abnormal Security** Credential Reference Table
| AirMDR field | What to enter | Where to get it |
| - | - | - |
| **API Token** | The token generated for the AirMDR connection | Abnormal Security **Settings → Integrations → API Token Management** |
| **Base URL** | Regional REST API URL | Select the US or EU URL from the regional Base URL table |
### Validate Connectivity
The following example retrieves threat information from the US API endpoint:
```json theme={null}
curl --request GET \
--url "https://api.abnormalplatform.com/v1/threats" \
--header "Authorization: Bearer " \
--header "Accept: application/json"
```
curl --request GET \\
\--url "[https://eu.rest.abnormalsecurity.com/v1/threats](https://eu.rest.abnormalsecurity.com/v1/threats)" \\
\--header "Authorization: Bearer \" \\
\--header "Accept: application/json"
\{
"instance": "Abnormal-Security-Production",
"base\_url": "[https://api.abnormalplatform.com/v1](https://api.abnormalplatform.com/v1)",
"api\_token": "\"
}
Abnormal Security also documents a `Mock-Data: True` header for testing supported requests without relying on production threat data.
Run manual API tests only from an approved system. Do not expose the token in shared terminal history or logs.
### Configure **Abnormal Security** in AirMDR Integrations Dashboard
1. Navigate to [AirMDR](https://app.airmdr.com/auth/login), provide the credentials and click **Login**
2. Navigate to the AirMDR Integrations Dashboard in the left navigation pane and select **ADMIN → Integrations**.
3. Use the search option, enter the keyword "**Abnormal Security**", select the **Connections** tab, and click **+ New Connection** button.
7. Confirm that the revoked token is no longer used by any AirMDR connection or other integration.
The Base URL is not generated with the token. Select it based on the region in which your Abnormal Security tenant is hosted.
| Tenant region | Base URL |
| - | - |
| US or standard production | `https://api.abnormalplatform.com` |
| European Union | `https://eu.rest.abnormalsecurity.com` |
These regional endpoints are listed in the [Abnormal Security API specification](https://apis.io/apis/abnormal/abnormal-cases-api/?utm_source=chatgpt.com).
Enter the Base URL only. Do not append an individual resource path such as `/threats` or `/cases`.
If you are unsure of the tenant region:
* Review your Abnormal Security onboarding information.
* Check the region associated with your tenant.
* Contact your Abnormal Security administrator or Abnormal Security Support.
For a FedRAMP/GovCloud environment, confirm the supported Base URL with Abnormal Security and AirMDR Support before creating the connection.
### **Abnormal Security** Credential Reference Table
| AirMDR field | What to enter | Where to get it |
| - | - | - |
| **API Token** | The token generated for the AirMDR connection | Abnormal Security **Settings → Integrations → API Token Management** |
| **Base URL** | Regional REST API URL | Select the US or EU URL from the regional Base URL table |
### Validate Connectivity
The following example retrieves threat information from the US API endpoint:
```json theme={null}
curl --request GET \
--url "https://api.abnormalplatform.com/v1/threats" \
--header "Authorization: Bearer " \
--header "Accept: application/json"
```
curl --request GET \\
\--url "[https://eu.rest.abnormalsecurity.com/v1/threats](https://eu.rest.abnormalsecurity.com/v1/threats)" \\
\--header "Authorization: Bearer \" \\
\--header "Accept: application/json"
\{
"instance": "Abnormal-Security-Production",
"base\_url": "[https://api.abnormalplatform.com/v1](https://api.abnormalplatform.com/v1)",
"api\_token": "\"
}
Abnormal Security also documents a `Mock-Data: True` header for testing supported requests without relying on production threat data.
Run manual API tests only from an approved system. Do not expose the token in shared terminal history or logs.
### Configure **Abnormal Security** in AirMDR Integrations Dashboard
1. Navigate to [AirMDR](https://app.airmdr.com/auth/login), provide the credentials and click **Login**
2. Navigate to the AirMDR Integrations Dashboard in the left navigation pane and select **ADMIN → Integrations**.
3. Use the search option, enter the keyword "**Abnormal Security**", select the **Connections** tab, and click **+ New Connection** button.
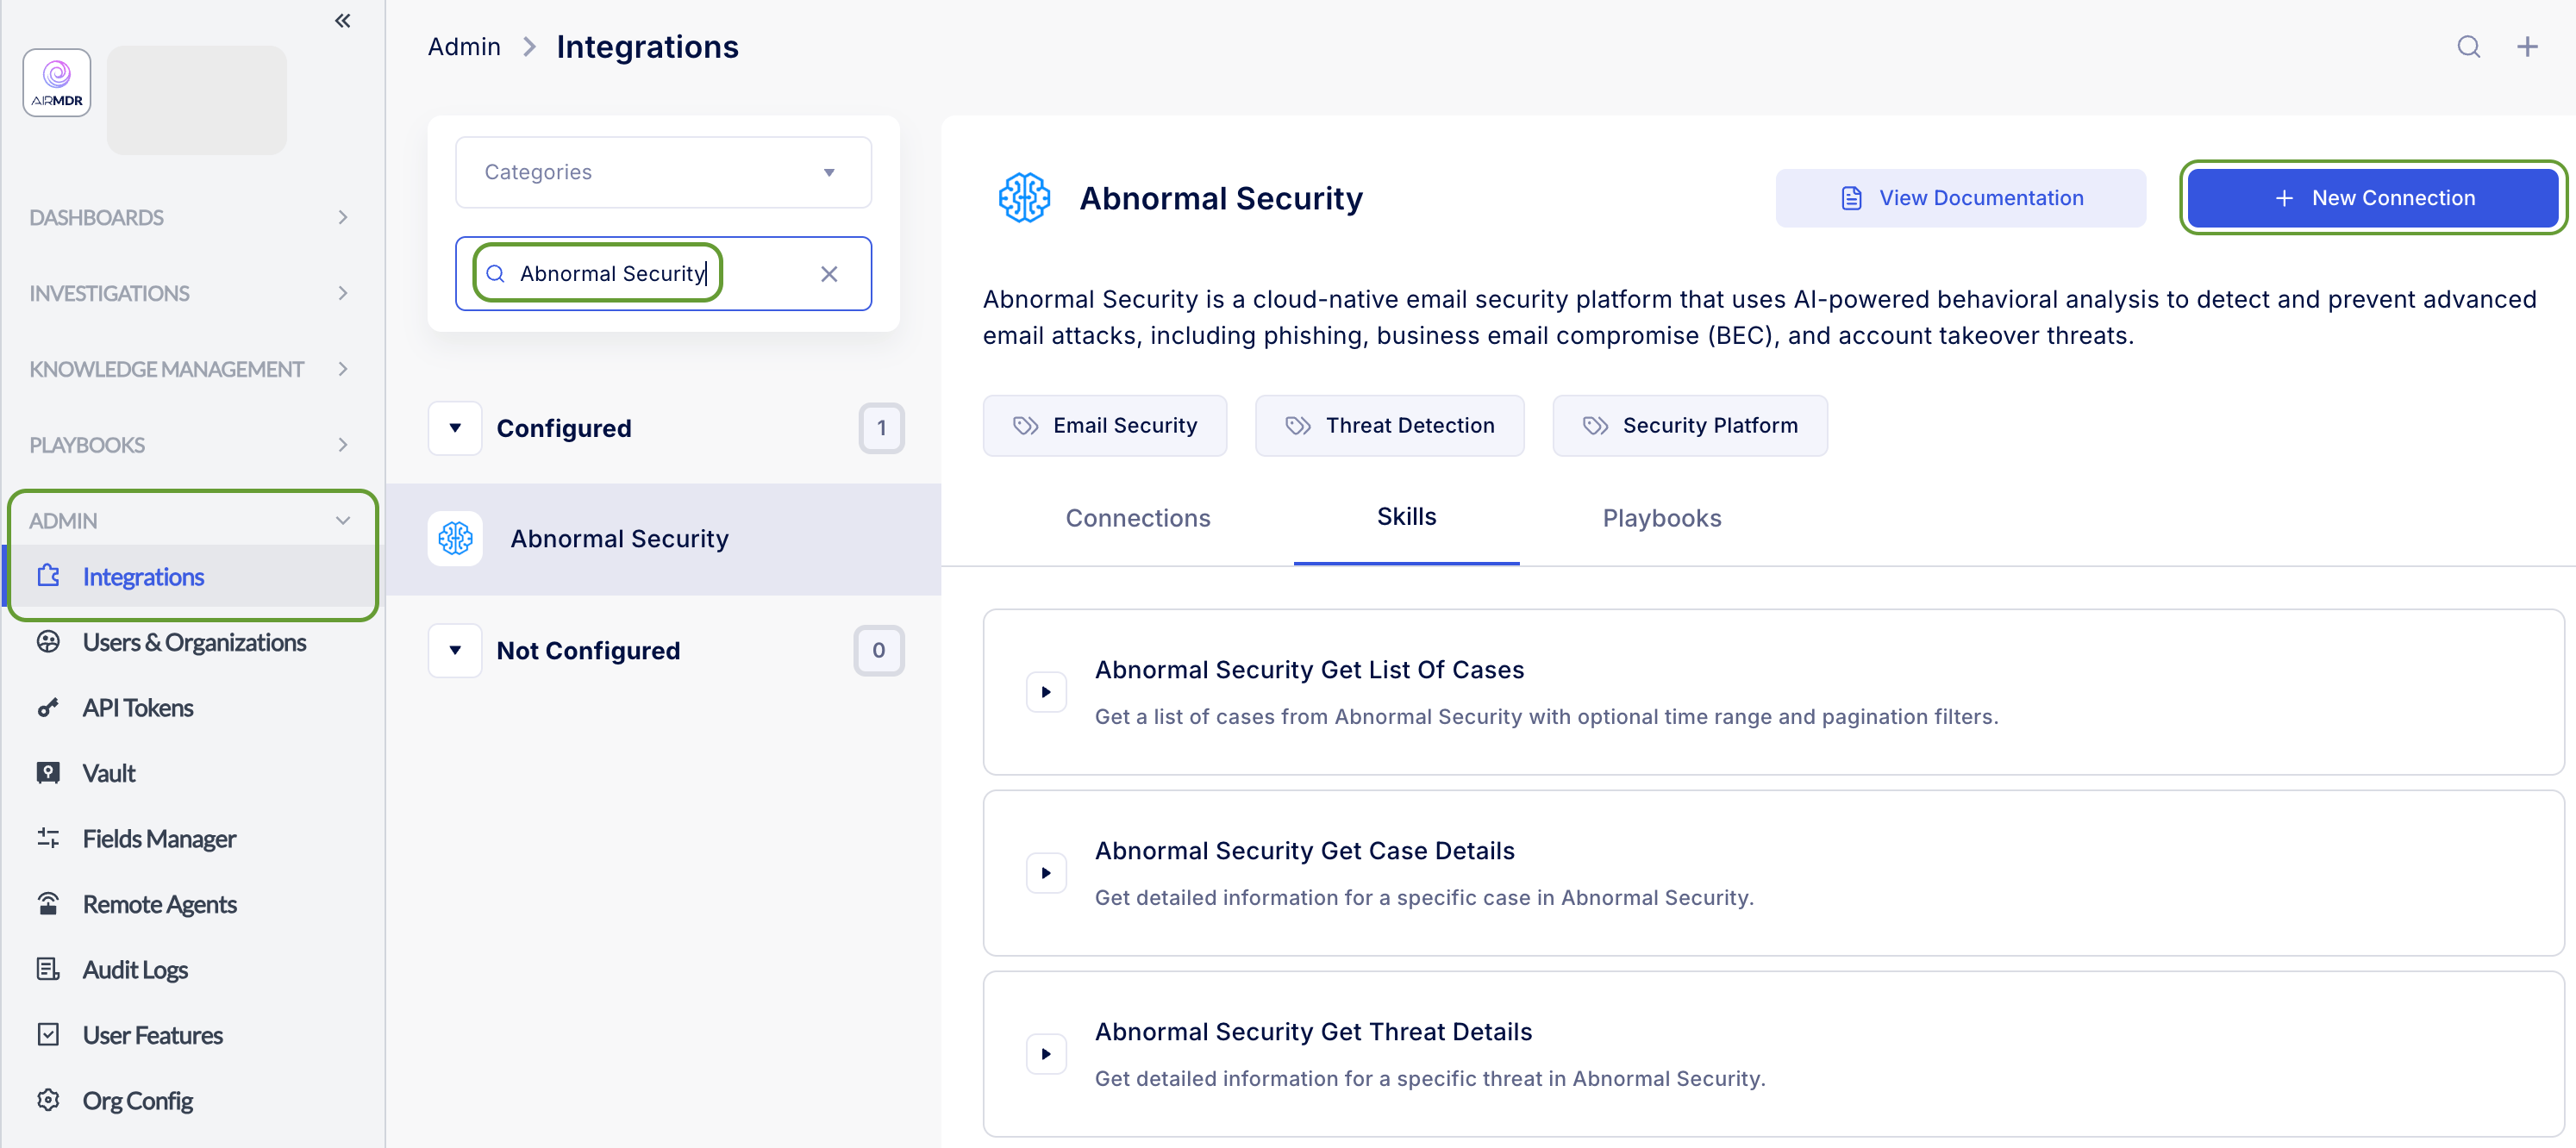 4. Use the following values in the AirMDR integration configuration screen:
Enter only the token value in **API Token**. Do not include the `Bearer` prefix. Enter the Base URL without appending endpoints such as `/threats` or `/cases`.
| AirMDR Field | Description | Example |
| - | - | - |
| **Instance** | Unique name for the Abnormal Security connection | `Abnormal-Security-Production` |
| **Organization** | Your Organization that will own the connection | Select from the organization list |
| **Description** | Purpose of the connection | `Abnormal Security production integration` |
| **API Token** | REST API token generated in Abnormal Security | `` |
| **Base URL** | Abnormal Security REST API URL for the tenant’s region | US: `https://api.abnormalplatform.com`
4. Use the following values in the AirMDR integration configuration screen:
Enter only the token value in **API Token**. Do not include the `Bearer` prefix. Enter the Base URL without appending endpoints such as `/threats` or `/cases`.
| AirMDR Field | Description | Example |
| - | - | - |
| **Instance** | Unique name for the Abnormal Security connection | `Abnormal-Security-Production` |
| **Organization** | Your Organization that will own the connection | Select from the organization list |
| **Description** | Purpose of the connection | `Abnormal Security production integration` |
| **API Token** | REST API token generated in Abnormal Security | `` |
| **Base URL** | Abnormal Security REST API URL for the tenant’s region | US: `https://api.abnormalplatform.com`
EU: `https://eu.rest.abnormalsecurity.com` |
1. In **Remote Agent**, leave the field unselected for a standard cloud connection. Select an AirMDR Remote Agent only when your organisation requires Abnormal Security API requests to pass through an approved private network route or a specific outbound IP address.
When using a Remote Agent, add the Remote Agent’s public outbound IP address to the **IP Safelist** configured for the Abnormal Security API token. Otherwise, Abnormal Security may reject requests with a `403 Forbidden` response.
2. In **Expiry**, select the date on which AirMDR should treat the stored connection credentials as expired, according to your organisation’s credential-rotation policy.
The AirMDR **Expiry** setting is a connection-management control. It does not automatically configure or rotate the API key in Abnormal Security.
5. Click **Save**.
### Skills provided by this Integration
| **Skill ID** | **Display Name** | **Permission Required** |
| - | - | - |
| `get_abnormal_security_list_of_cases` | Abnormal Security Get List Of Cases | **Cases – Read** (`GET /cases`) |
| `get_abnormal_security_case_details` | Abnormal Security Get Case Details | **Cases – Read** (`GET /cases/{id}`) |
| `get_abnormal_security_case_analysis` | Abnormal Security Get Case Analysis | **Cases – Read** (`GET /cases/{id}/analysis`) |
Case-related skills may require the applicable Abnormal Security product entitlement. Confirm that the selected tenant supports the Cases API.
| **Skill ID** | **Display Name** | **Permission Required** |
| - | - | - |
| `get_abnormal_security_list_of_threats` | Abnormal Security Get List Of Threats | **Threats – Read** (`GET /threats`) |
| `get_abnormal_security_threat_details` | Abnormal Security Get Threat Details | **Threats – Read** (`GET /threats/{id}`) |
| `get_abnormal_security_threat_attachments` | Abnormal Security Get Threat Attachments | **Threats – Read** (`GET /threats/{id}/attachments`) |
| `get_abnormal_security_threat_links` | Abnormal Security Get Threat Links | **Threats – Read** (`GET /threats/{id}/links`) |
To view the details of Input Parameters and Output for the respective skills
To view a skill’s input parameters and outputs:
* Go to [AirMDR → Abnormal Security](https://app.airmdr.com/integrationsv2/be407916-c83b-4906-b93d-24d5362aa9b8/skills?search=abnorma) Integration page.
* Select the **Skills** tab and click on the required listed skills.
## Additional Information
| Symptom/status | Possible cause | Resolution |
| - | - | - |
| Connection cannot be saved | Required field is empty or Base URL is invalid | Verify the API Token and regional Base URL |
| `400 Bad Request` | Invalid parameter, resource path, or request format | Review the skill inputs and API request format |
| `401 Unauthorized` | Token is incorrect, expired, revoked, or copied incompletely | Generate or rotate the token and update the AirMDR connection |
| `403 Forbidden` | Missing endpoint permission or AirMDR IP is not safelisted | Review Custom Access and the token IP safelist |
| `404 Not Found` | Incorrect Base URL or unsupported resource | Enter only the correct regional API v1 Base URL |
| `429 Too Many Requests` | Abnormal Security rate limit reached | Reduce repeated requests and retry after the applicable delay |
| `5xx` response | Temporary Abnormal Security service-side error | Retry later and check service availability |
| Cases operation fails | Account Takeover Protection license or Cases access is missing | Confirm the license and token permissions |
| Read works but response action fails | Token has read access but not write/manage access | Add only the required action permission or use a separate action token |
| US URL fails for a valid token | Tenant may be hosted in the EU region | Replace the Base URL with the EU endpoint |
| No data returned | No matching records, incorrect filters, or missing product entitlement | Verify the request period, filters, permissions, and Abnormal Security license |
### AirMDR monitoring
Monitor:
* Connection status.
* Skill-execution status.
* Playbook execution history.
* Authentication and authorization failures.
* API timeouts and network errors.
When reviewing failures, verify:
* Connection instance used by the skill.
* Execution timestamp.
* HTTP status code.
* Requested operation.
* Error response, excluding credentials.
### Abnormal Security monitoring
In Abnormal Security:
1. Navigate to **Settings > Integrations**.
2. Open **API Token Management**.
3. Confirm that the AirMDR token is active.
4. Verify its expiration date.
5. Confirm the selected tenant and endpoint access.
6. Verify the IP safelist.
7. Rotate or revoke the token if suspicious usage is detected.
### Example sanitized log entries
Successful request:
```text theme={null}
INFO Abnormal Security request completed
connection=Abnormal-Security-Production
endpoint=/threats
status=200
```
Authentication failure:
```text theme={null}
ERROR Abnormal Security authentication failed
connection=Abnormal-Security-Production
status=401
reason=Invalid, expired, or revoked API token
```
Authorization failure:
```text theme={null}
ERROR Abnormal Security request forbidden
connection=Abnormal-Security-Production
status=403
reason=Insufficient endpoint access or source IP not safelisted
```
Never record the API token or complete Authorization header in logs.
### ✅ Do
* Use **Custom Access** and assign the minimum endpoint permissions required.
* Use a dedicated token for the AirMDR integration.
* Configure an expiration period.
* Safelist only approved AirMDR outbound IP addresses.
* Store the token in the AirMDR credential field or an approved secrets manager.
* Rotate the token according to your organization’s credential policy.
* Use separate read-only and response-action tokens when operational separation is required.
* Revoke unused, expired, or potentially compromised tokens.
* Verify the tenant region before entering the Base URL.
### ❌ Don’t
* Granting full access when read-only access is sufficient.
* Reusing a personal or unrelated integration token.
* Adding `/threats`, `/cases`, or another resource path to the Base URL.
* Entering the EU Base URL for a US tenant, or vice versa.
* Including `Bearer` in the AirMDR token field unless explicitly required.
* Sharing the token through email, chat, documentation, screenshots, or tickets.
* Logging the token or Authorization header.
* Disabling certificate validation.
* 📧 Contact [**AirMDR Support**](mailto:support@airmdr.com) through your designated support channel.
* 🔁 Rotate credentials regularly. Recommended cadence: As per your internal security policy
* 🔄 **Reconnect with AirMDR immediately when secrets are changed.**
### **Data flow**
1. An AirMDR playbook or analyst initiates an Abnormal Security skill.
2. AirMDR retrieves the stored connection credentials.
3. AirMDR sends an HTTPS request to the configured regional Base URL.
4. Abnormal Security validates the API token, endpoint permission, token scope, expiration, and IP safelist.
5. Abnormal Security returns the permitted response.
6. AirMDR makes the results available to the playbook or analyst.
### Data exchanged
The data exchanged depends on the skill and permissions assigned to the token. It may include:
* Threat identifiers and threat details.
* Sender and recipient information.
* Attack type and remediation status.
* Message and attachment metadata.
* Case information and status.
* Employee or user information.
* Action identifiers and action-status information.
### Network and encryption
| Requirement | Value |
| :- | :- |
| Protocol | HTTPS |
| Port | TCP 443 |
| Authentication | Bearer API token |
| US endpoint | `api.abnormalplatform.com` |
| EU endpoint | `eu.rest.abnormalsecurity.com` |
| IP restriction | Configurable through the Abnormal Security token IP safelist |
All network communication must use the HTTPS endpoint. Do not replace `https:// `with `http://`.
This documentation is built and hosted on [Mintlify](https://mintlify.com), a developer documentation platform.